> For the complete documentation index, see [llms.txt](https://docs.theshoppad.com/uploadery/llms.txt). Markdown versions of documentation pages are available by appending `.md` to page URLs; this page is available as [Markdown](https://docs.theshoppad.com/uploadery/install-uploadery/manually-reposition-uploadery-on-a-specific-theme/install-in-1.0-themes.md).
# Manually reposition Uploadery in 1.0 themes
Add the Uploadery install snippet to product.liquid by hand on an older Shopify 1.0 theme, after locating the product form in your theme code.
Turning on the [**Uploadery app embed**](https://docs.theshoppad.com/uploadery/readme/install-uploadery/) is the only thing you need to do to enable Uploadery on a 2.0 theme. Once it's toggled on, your upload fields automatically display above the Add to Cart button on your product pages, no other setup required.
The app embed places your upload fields in the default position, above the Add to Cart button.
Follow the steps below **only if** you want your upload fields to appear at an exact spot instead. This involves adding the **Uploadery** install snippet to your theme code manually.
:::caution
If you are comfortable with your upload fields automatically appearing above the Add to Cart button on product pages, you **do not** need to follow the manual repositioning guides. You only need to ensure that you have [turned on the app embed](https://docs.theshoppad.com/uploadery/readme/install-uploadery/).
:::
Follow the step-by-step instructions on how to manually reposition Uploadery in your theme code with the install snippet:
```html
```
***
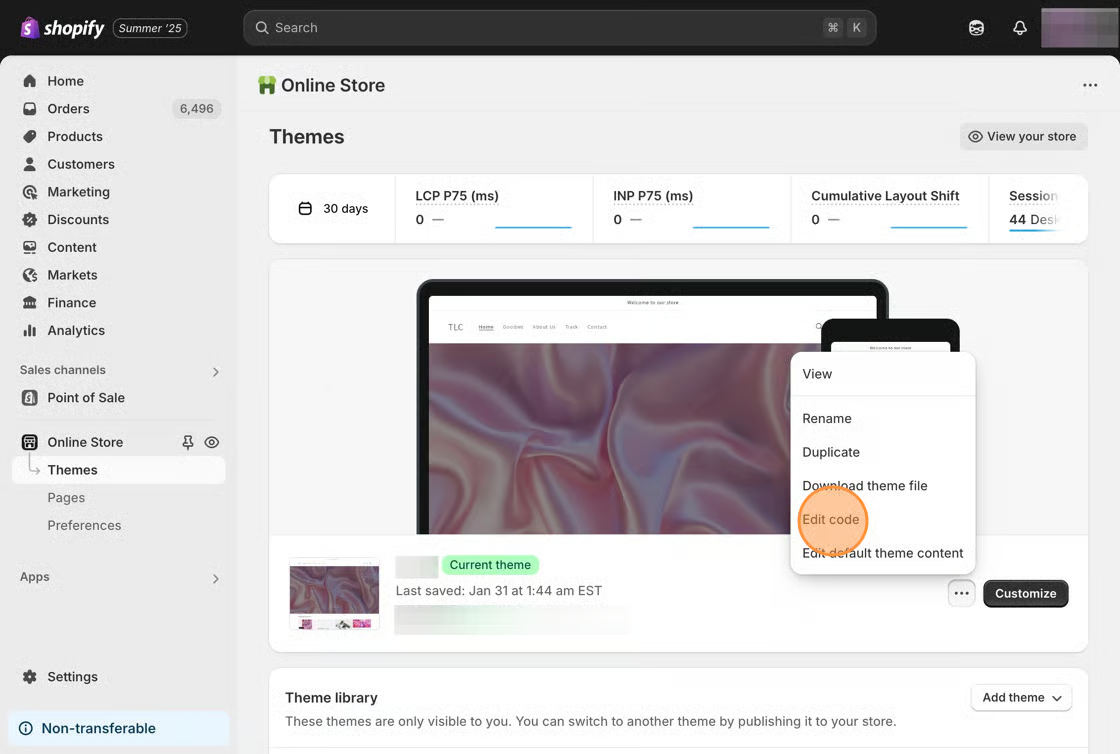
1\. Starting from your Shopify dashboard, click on **Online Store**, and then click on **Themes**.
2\. Click the **Actions** button, then select **Edit code.**
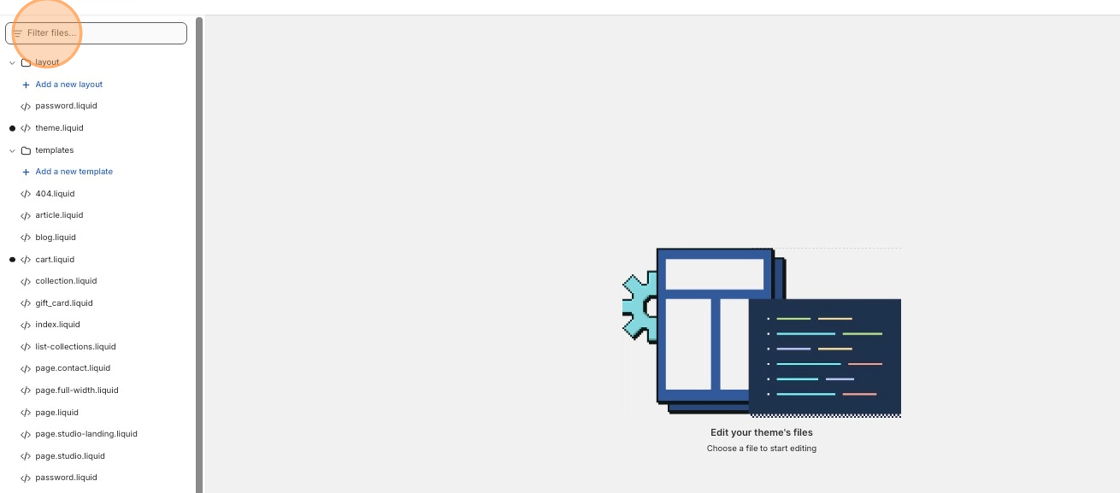
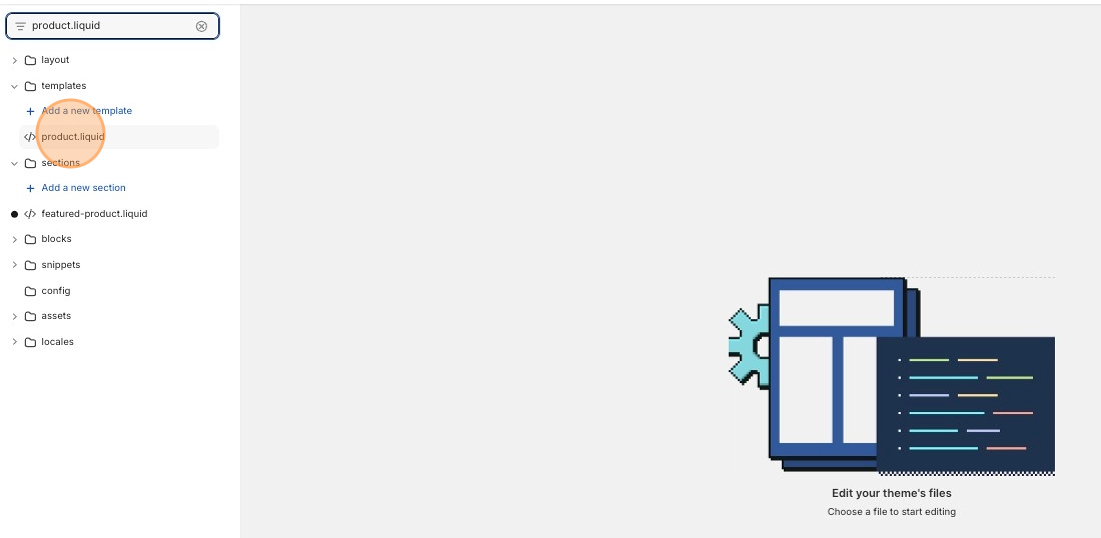
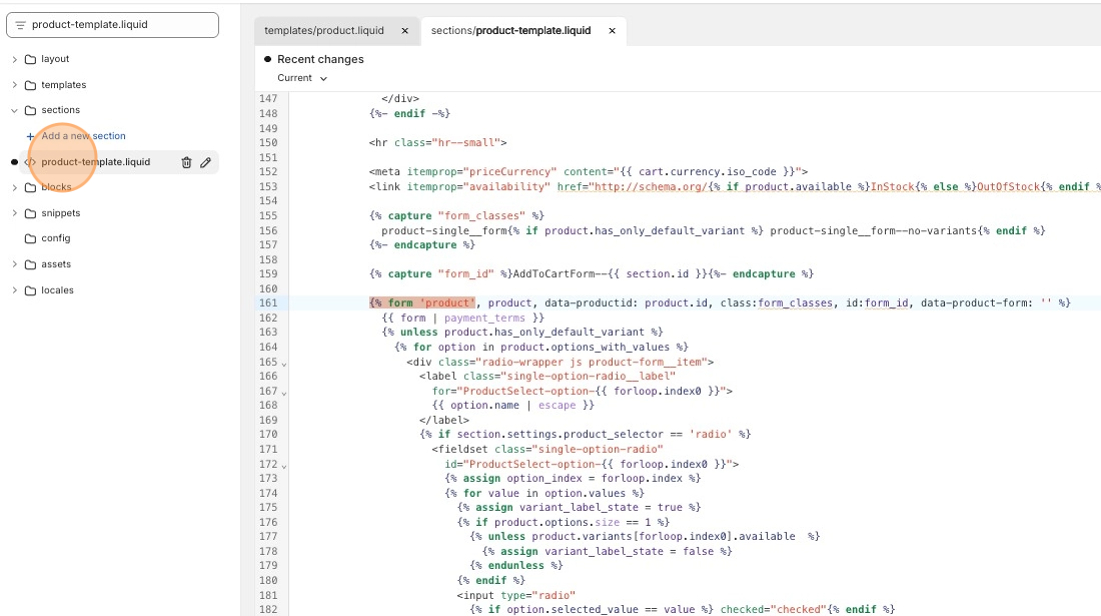
3\. Use the search bar located in the top left of the code editor to search for your **product.liquid** file.
4\. Click into your **product.liquid** file.
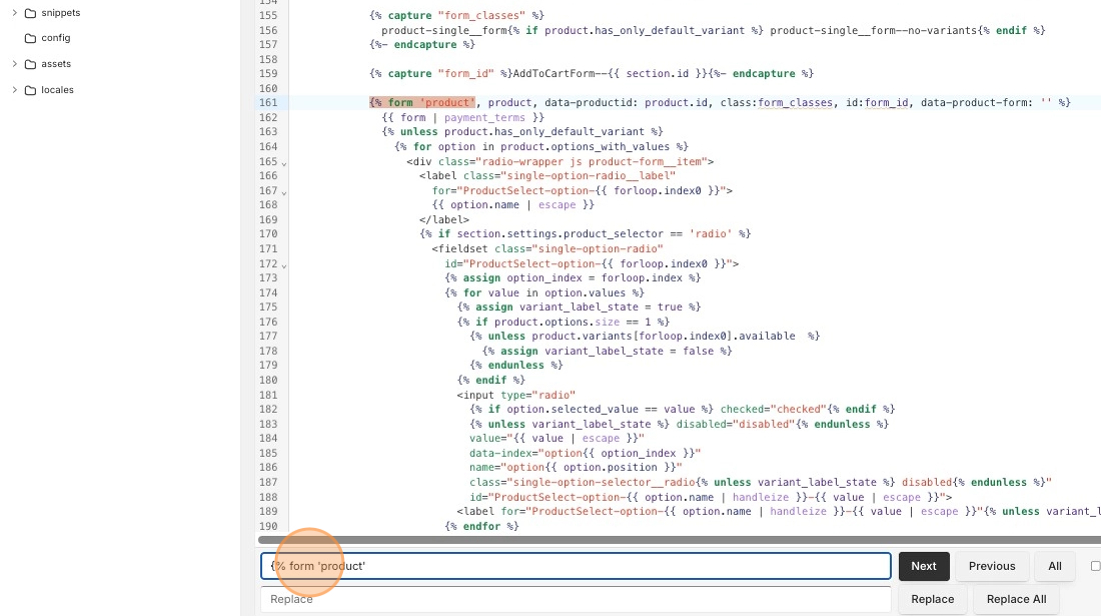
5\. Do a search using the keyboard shortcuts (ctrl F or ⌘ F) for the following line of code.
```liquid
{% form 'product'
```
6\. If you found a match, [click here to skip to step 10](https://docs.theshoppad.com/uploadery/install-uploadery/manually-reposition-uploadery-on-a-specific-theme/install-in-1.0-themes/#step-10).
If no results show up, search for the **product-template.liquid** file and click on it.
7\. Do a search again for `{% form 'product'` using the keyboard shortcuts (ctrl F or ⌘ F).
8\. If you found a match, [click here to skip to step 10](https://docs.theshoppad.com/uploadery/install-uploadery/manually-reposition-uploadery-on-a-specific-theme/install-in-1.0-themes/#step-10).
* If no results show up, search for the **product-form.liquid** file and click on it.
9\. Do a search again for `{% form 'product'` using the keyboard shortcuts (ctrl F or ⌘ F).
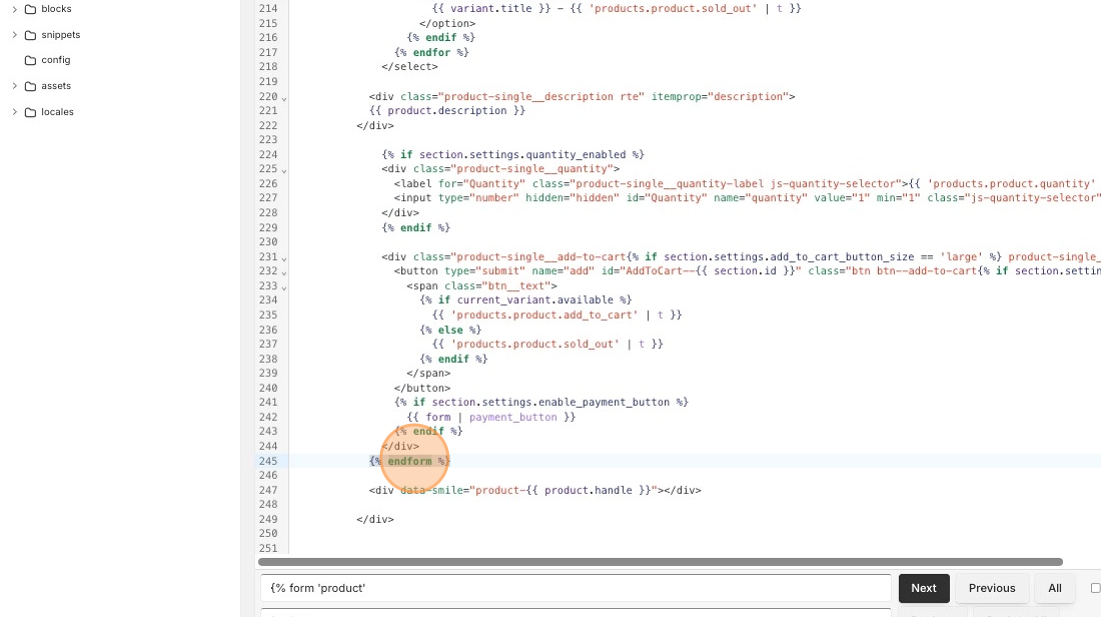
10\. Once you find that line of code, please locate the following `{% endform %}` tag a few code blocks below.
This designates the section where the install code snippet (available in the next step) should be placed within. For example, in the image below, the section is located between lines 161 and 245.
11\. Start by copying the Uploadery install code snippet below.
```html
```
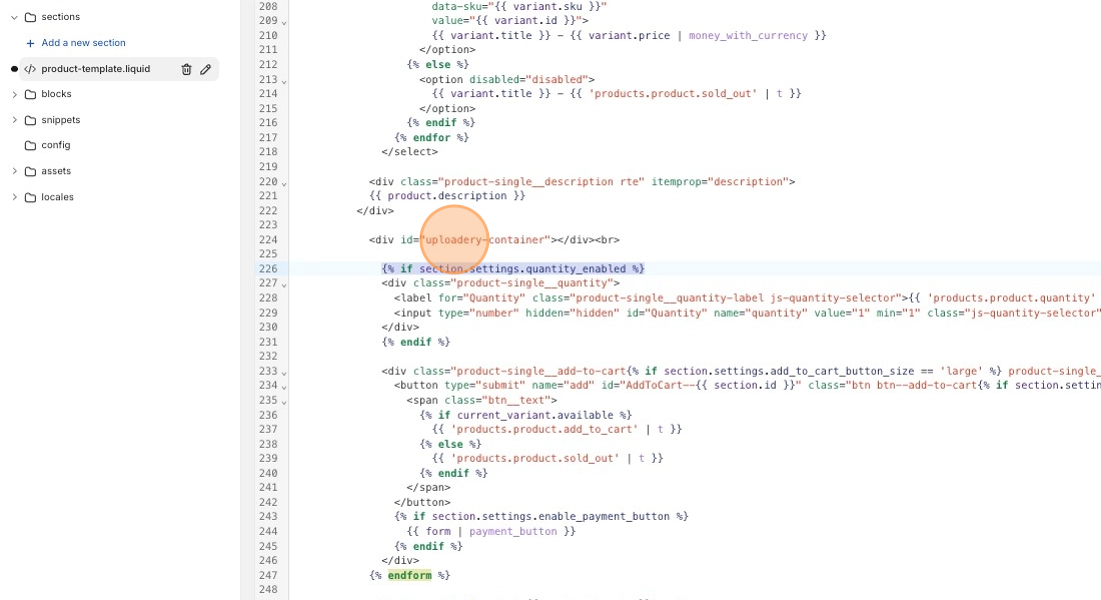
12\. Within this section of code, look for the word **quantity**_._ Paste the install code snippet above that, as seen below.
Not seeing a quantity section? Look for **add to cart** text and paste the install code snippet above that section.
13\. Save your changes.
14\. You can now start creating upload fields for your products. Follow the instructions in [this article](https://docs.theshoppad.com/uploadery/readme/create-and-display-upload-fields/) to get started.
***
### What's next?
Add a snippet of code so upload fields can display quicker on your product page: [Decrease Uploadery's load time](https://docs.theshoppad.com/uploadery/troubleshooting/decrease-uploaderys-load-time/).
### Need to adjust the upload link on the cart page?
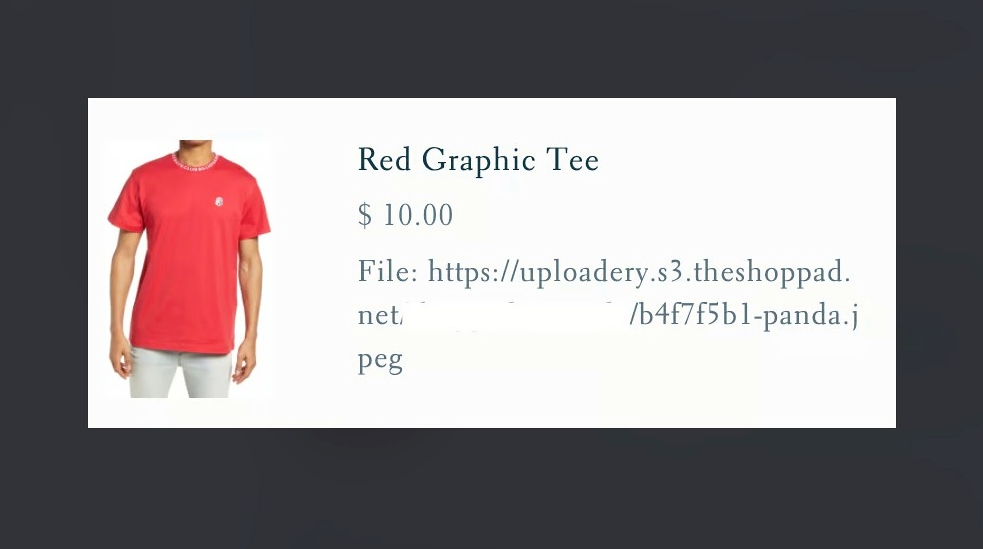
Shorten the link shown on the cart page by adjusting the upload link: [Display file upload details in the cart page](https://docs.theshoppad.com/uploadery/customize-the-app/display-a-short-link-on-the-cart/).
### Want to customize the look of your upload fields?
**Here are some great resources to get you started:**
* [Style your upload fields](https://docs.theshoppad.com/uploadery/customize-the-app/style-file-upload-fields/)
* [Add an image preview to the product page](https://docs.theshoppad.com/uploadery/customize-the-app/add-an-image-preview-to-the-product-page/)
***